Pages

Showing posts with label basic sewing skills. Show all posts

Wednesday, July 14, 2010

Tutorial: Sewing Kit - Basic Sewing Skills


The following picture tutorial will teach you how to make a sewing kit. This sewing kit is great for beginners as it covers several basic skills - sewing seams with right sides together, clipping corners to reduce bulk, turning and pressing pieces - like one would do for a pillow case, pressing up a hem and stitching - like you could do to hem pants, top-stitching, sewing on a button and hand stitching.

I've included pictures of each step as again, this is a great project for beginners. To view any of the pictures larger, simply click on them.

Sewing Kit

Materials:
1 - 20" x 15" piece of cotton fabric
1 - Button
1 - 8" - 10" piece of ribbon (1/2" wide or less is best)

Equipment:
Sewing Machine (you could also hand stitch the whole thing as well)
Iron
Needle
Thread
Scissors
Pins

Suggested supplies to fill your finished sewing kit:
Safety Pins
Straight Pins
Needles
Spools of Thread
Needle Threader
Small scissors (manicure scissors are great)
Seam Ripper
Measuring Tape etc.

Instructions:
1. Cut a rectangle of fabric 20" x 15".

2. With right sides together (in sewing the right side is what you would consider the outside - the bolder print, the front, the wrong side is the back/inside/less bright print), fold the fabric in half on the 20” long side. Pin each side. When you pin be sure to insert the pins perpendicular to the edge/stitch line.

3. Stitch down each side about 5/8” in from the edge. Be sure to back stitch at each end. Remove pins. Trim threads.
4. Trim the corners at a diagonal on the fold end of the seam. Be careful not to clip the stitches.

5. Turn right side out, use a blunt pointed object to push out the corners to give a sharp finish and press with the iron.
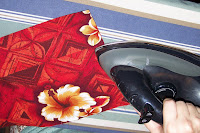
6. The fold side will be the top, the rough raw edge will be the bottom. Fold the raw edge up ½” and press with the iron. Fold up a second time ½” hiding the raw edge and iron again. Pin the ironed side.

7. Stitch along the inner edge of the folded side. Back stitch at each end. Remove pins. Trim threads.
8. Fold up the bottom edge about 3” (just under half way) with the folded edge facing inside. Pin both sides and stitch the full length of the sides. Remove pins. Trim threads.

9. With the bottom of pocket facing you, fold the fabric in thirds like a letter, bringing the stitched edges to meet the folds. Mark the crease lines with a pin at the top and the bottom of each.
10. Stitch from the bottom of the sewing kit to the top, back stitch at both ends, following the invisible crease line you marked with the pins. Do this for both crease lines. Remove pins. Trim threads.
11. Fold the sewing kit in half, lining up the two stitched sides, mark the crease line with a pin at the top and bottom as you did in the previous step. Stitch from the bottom of the sewing kit to the top, back stitch at both ends, following the invisible crease line you marked with the pins. Remove pins. Trim threads.
12. Fold the sewing kit in thirds along your stitch lines. Insert the right side flap first. On the outside of the left hand flap, attach a button about 1” from the edge, half way up the front. Be careful not to sew it into your pocket, thus stitching your pocket closed.
13. Close the sewing kit again. With your 8” – 10” strip of ribbon, make a loop around the button. Line up the ends of the ribbon and reach them around to the back, fold the raw ends under, pin in place and stitch the ribbon loop. Again, be careful not to sew into your pocket on the inside.

14. To finish, insert pins, needles, spools of thread and needle threader that are provided today. At home, you can add a small pair of scissors, a seam ripper, a tape measure and more!

Basic Sewing Skills/Make a Sewing Kit Workshop


The rain scared away many tonight, but I was able to teach a couple of interested minds about basic sewing skills. If you wanted to come to today's workshop and the rain kept you home, I encourage you to stop by the store and pick up an instruction sheet and kit to make your own sewing kit at home. If you have never sewed before, let me know when you stop in, I'd be happy to work with you on the machine.

Also, check back on my blog, I will be posting a step by step photo tutorial on how to make your own sewing kit.

This Saturday I will have supplies available for you to learn how to do fashion drawings. I have the workshop scheduled for 4 PM but I would be happy to instruct you anytime throughout the day, just ask :)

Saturday, July 17, 4 PM FREE—Workshop: Fashion Design Drawing
10-20 Participants
Open to all ages.
Participants will learn how to draw clothing design ideas from different perspectives: front, side, back. They will be given instruction on how to emulate pleats, texture, print, volume etc. in their drawings. If participants wish to later construct their designs, suggestions on how much fabric and which materials they need will be given.

Tuesday, July 13, 2010

YazBerry Handmade Fashion August Class Schedule


Since I have my act together in planning classes for August ahead of schedule, I will post it now so you can start thinking about which classes you might want to take and to plan your own schedule.

All classes will be held in the courtyard outside of YazBerry Handmade Fashion, Artists' Row, 24 New Derby St., Unit #5, Salem, MA 01970 (across from Walgreens).

AUGUST CLASSES & DEMONSTRATIONS
Please e-mail berry@yazberry.com to register or stop in the store. Class size is limited due to space. May be some room for drop-ins day of class.

Instrucción disponible en español.
Instrução disponível no português.


**Parents, please use your best judgment if you feel your child is the right age to participate in the various workshops. You are welcome and encouraged to come along to help them out as you see fit. I encourage interest in the arts as early as possible.**

FREE Demonstration: Fashion Design Process
Participation unlimited, Space Permitting
Open to all ages.

Wednesday, August 11, 6 PM
I will demonstrate how I go about designing a purse. From the inspiration, to drafting the pattern, selecting the fabric and beginning the assembly. I won’t finish the purse as it takes several hours, but will begin some assembly.

Workshop: Recycled Junk Fashion Project (2 Sessions) $15 (both sessions included)
Limit 5-15 Participants
Open to all ages.

Wednesday, August 18, 6 PM
Younger children should be supervised as use of sewing machines & hot iron may be required.
Session I: Participants will be presented with a varied selection of items not typically associated with clothing. They are encouraged to bring ‘junk’ from home. I will provide a large selection of items. Then, using imagination and tools typically found in a sewing studio, participants will create wearable clothing items and accessories from the junk.

Date TBD-Session II Student Performance: Participants will put on a fashion show showing off their creations. They will be encouraged to invite family and friends to view the fashion show.

FREE Workshop: Basic Sewing Skills/Make a Rag Doll
Limit 5-10 Participants
Open to all ages.

Friday, August 27, 6 PM
Younger children should be supervised as use of sewing machines & hot iron may be required.
Participants will learn how to use a sewing pattern, follow instructions on a pattern and assemble a 3-D rag doll. The Rag Doll Pattern is supplied by Rag Dolls 2 Love, Inc., an organization that donates handmade dolls to children in war torn and disaster stricken areas. Students will be encouraged to donate their dolls, but can also take the dolls and patterns home and share the project with friends.

Hand Cut Leather Lace Demonstration


Here are some pictures from the Hand Cut Leather Lace Demonstration last week outside of my YazBerry Handmade Fashion Store on Artists' Row in Salem, MA.

Friday, July 9 at 6 PM. I had a half dozen interested minds stop by to learn about the history of cut paper art and how I have adapted this art form to cut leather lace. Pictured are samples of my work in leather, an example of Chinese cut paper art (circular picture with fish in red) and hanging behind me is iParty's rendition of Mexican Papel Picado (which is typically done in tissue paper). Also pictured are my tools.


Stop by this week to check out the next two free workshops I'm offering:
Wed 14, 7 PM FREE—Workshop: Basic Sewing Skills/Make a Sewing Kit
5-15 Participants
Open to all ages.
Younger children should be supervised as use of sewing machines & hot iron may be required.
Participants will learn how to sew on a button, mend a tear, hide a snag and hem pants. Basic instructions on how to use a needle and thread and a sewing machine will be taught. Insider tips and tricks will be shared. Participants will use the skills learned to make a simple sewing kit to hold needles, thread, pins etc. that I will provide.

Sat 17, 4 PM FREE—Workshop: Fashion Design Drawing
10-20 Participants
Open to all ages.
Participants will learn how to draw clothing design ideas from different perspectives: front, side, back. They will be given instruction on how to emulate pleats, texture, print, volume etc. in their drawings. If participants wish to later construct their designs, suggestions on how much fabric and which materials they need will be given.

To see what other great workshops, performances and demonstrations will be offered by other Artists on Artists' Row, check out the All Artists' Row calendar.

Thursday, July 01, 2010

YazBerry Handmade Fashion July Class Schedule

To view my Google Calendar visit this link.

**Parents, please use your best judgment if you feel your child is the right age to participate in the various workshops. You are welcome and encouraged to come along to help them out as you see fit. I encourage interest in the arts as early as possible.**


JULY
Fri 9, 6 PM FREE—Demonstration: Hand Cut Leather Lace
Unlimited, Space Permitting
Open to all ages.

I will demonstrate how I hand cut leather to make leather lace bracelets and jewelry. I will cover the basic skills and techniques used in Chinese & Japanese Cut Paper art and how I have applied these techniques to leather. I will share the history on cut paper art, educate participants on other cultures, such as Mexican, with a history of cut paper art.

Wed 14, 7 PM FREE—Workshop: Basic Sewing Skills/Make a Sewing Kit

5-15 Participants
Open to all ages.

Younger children should be supervised as use of sewing machines & hot iron may be required.
Participants will learn how to sew on a button, mend a tear, hide a snag and hem pants. Basic instructions on how to use a needle and thread and a sewing machine will be taught. Insider tips and tricks will be shared. Participants will use the skills learned to make a simple sewing kit to hold needles, thread, pins etc. that I will provide.

Sat 17, 4 PM FREE—Workshop: Fashion Design Drawing
10-20 Participants
Open to all ages.

Participants will learn how to draw clothing design ideas from different perspectives: front, side, back. They will be given instruction on how to emulate pleats, texture, print, volume etc. in their drawings. If participants wish to later construct their designs, suggestions on how much fabric and which materials they need will be given.

Wed 21, 7 PM $15—Workshop: Recycled T-Shirt Fashion Project (2 sessions)
5-15 Participants
Open to all ages.
Younger children should be supervised as use of sewing machines & hot iron may be required.

Session I: Participants will take a look at a conventional t-shirt and will explore ways to restyle it, give new life and make it into something completely different. A restyled shirt? A skirt? A Dress? A Purse? Something entirely new and different?

Date TBD- Session II Student Performance: While participants are thinking about how to re-envision one of the most conventional garments out there, they will be challenged to re-envision the fashion show and other means of presenting a body of garments. Participants will plan and execute whatever form of fashion presentation the group chooses.